Showing posts with label Primary Two. Show all posts
Showing posts with label Primary Two. Show all posts
Monday, January 14, 2013


Wednesday, June 27, 2012
Leaf Printing
In term 3 week 2, children will be doing leaf printing. They can bring a variety of leaf-cuttings from home.
Materials provided:


Materials provided:
- Paint
- Leaves
- Colours scheme
- Textures
Pupils' work
 |
| Collect fresh leaves |
 |
| Primary colours |


 |
| By Julia from P2 Thinker |
 |
| By Szee Wei from P2 Thinker |
 |
| By Vernice from P2 Thinker |
Instructions:
- Paint the BACK of the leaf using a colour they desire. The BACK of the leaf has veins and stem that are most prominent so it make a better imprint
- Press the painted leaf down onto the blank paper PAINT-SIDE DOWN
- Rub gently over the entire leaf to transfer the paint evenly
- Gently peel the leaf off the paper to see the beautiful imprint
Thursday, April 26, 2012


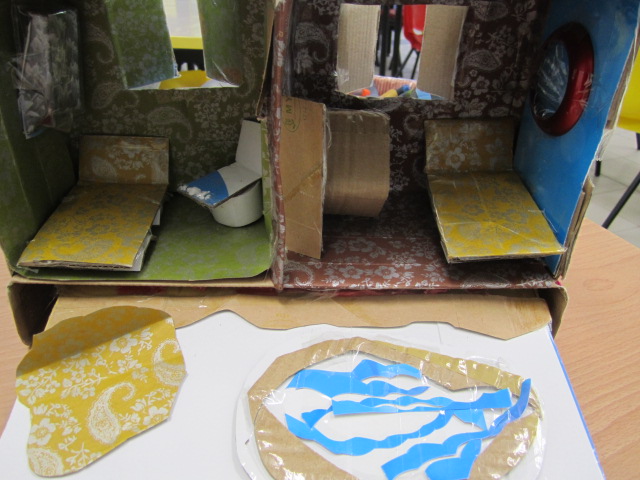


Monday, April 2, 2012
3D buildings
This week, pupils will continue their model of 3D buildings. We are interested in exploring parallel lines of a 3D object. Pupils are encouraged to bring their own boxes for this project but not bigger than the size of a shoebox. Some pupils have discovered that that their watercolour could not stay on boxes with glossy finishes. An alternative is to put patterns on plain papers and use it to cover the boxes or cover the boxes with plain paper first and apply the design later.


Friday, March 2, 2012
P2 Art Evaluation

Week 9: Pupils will be selecting their favourite piece of work.

Week 10: Teacher will grade pupils' work according to a rubric. Additional comments may be added.

Week 10: Pupils will bring the art file home. Parents will select one of their favourite artpieces and make a comment. Please acknowledge by signing in the bottom right-hand corner of the paper. A handful of pupils still did not hand in their art files, they weren't given the art pieces to bring home.
Wednesday, February 22, 2012
Week 8: Collage
The Primary 2 pupils browsed through magazines and looked for suitable pictures to be pasted on last week's drawing (about lines).


Tuesday, February 14, 2012
Week 7: Lines
The lesson began with children discussing about a landscape made out of lines (on Powerpoint slideshow, not shown in the pictures). They described the picture given as accurately as possible. Then we moved on to talk about the various kinds of lines and its names.


The 4 general steps for doing Art discussion are listed below. I will further break down the questions or build on children's answers depending on the topic:
Desciption: Observe the artwork closely. Describe what's seen.
Analysis: Identify significant art elements and principles. Analyse how these are used to achieve effects.
Interpretation: What does it mean/ represent? Explain based on visual evidence and one's knowledge, experiences and ideas.
Judgement: Form personal opinions about artwork and evidence.
--------------------------------------------------------------------------------


The 4 general steps for doing Art discussion are listed below. I will further break down the questions or build on children's answers depending on the topic:
Desciption: Observe the artwork closely. Describe what's seen.
Analysis: Identify significant art elements and principles. Analyse how these are used to achieve effects.
Interpretation: What does it mean/ represent? Explain based on visual evidence and one's knowledge, experiences and ideas.
Judgement: Form personal opinions about artwork and evidence.
--------------------------------------------------------------------------------
What do you think this is?

It's a chair!
 |
| Lines are all around us. Be observant about lines in our environment and how functional they can be. |
30 second animation beginning and ending with a straight horizontal line in the middle of the page. Made with Flip Boom Draw on an iPad. Some sounds recorded on the iPad with (free) Sound Recorder with Skins Lite. Used Final Cut Pro on a Mac to place the sound effects in the right place.
Friday, February 10, 2012
Week 6: colouring


- the strokes (directions) are different in too many ways
- lots of spaces (white) still waiting to be filled
- number 2 is untidy
- they would prefer number 1 if they were a teacher

Now, relate this story to their art supplies. The drawing paper is our clothes and the crayon is the raincoat/ umbrella. When we are using the crayon to draw on the paper, the area (in this case, I drew lines) became waterproof. That means the lines will not be wet. The rest of the area not covered by the crayon will be wet because it is not waterproof.
Children has to mix well when using their watercolour. Otherwise, they will be "painting with water" instead.
 |
| water colour, crayon and colour pencil |
 |
| Water colour and crayon |
Thursday, January 26, 2012
Week 4: Occupations
The pupils discussed about occupations this week. Take a look at their drawings and guess their job!


Reminder to all P2 pupils: Bring colouring materials in Week 5.
Friday, January 13, 2012
Week 2
This week, we practise making a CNY lantern. It's not easy making a series of cuts but we can manage. We will do better next week!
REMINDER to P2 pupils:
* Bring in the following in WEEK 3:
- some red packets/ red construction paper/ gift wrapping
- gluestick/ double-sided tape
- scissors
Thanks for your attention!
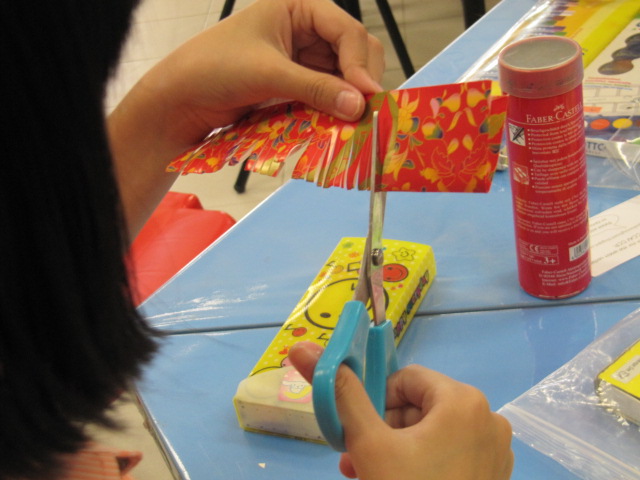 |
| Cutting carefully |
 |
| Cutting into strips |
 |
| Done |
 |
| CNY lantern |
This week, we practise making a CNY lantern. It's not easy making a series of cuts but we can manage. We will do better next week!
REMINDER to P2 pupils:
* Bring in the following in WEEK 3:
- some red packets/ red construction paper/ gift wrapping
- gluestick/ double-sided tape
- scissors
Thanks for your attention!

Subscribe to:
Posts (Atom)